Plans
Test Plans is not enabled by default
Contact your project admin to enable this feature, or learn how to enable it yourself if you have admin access.
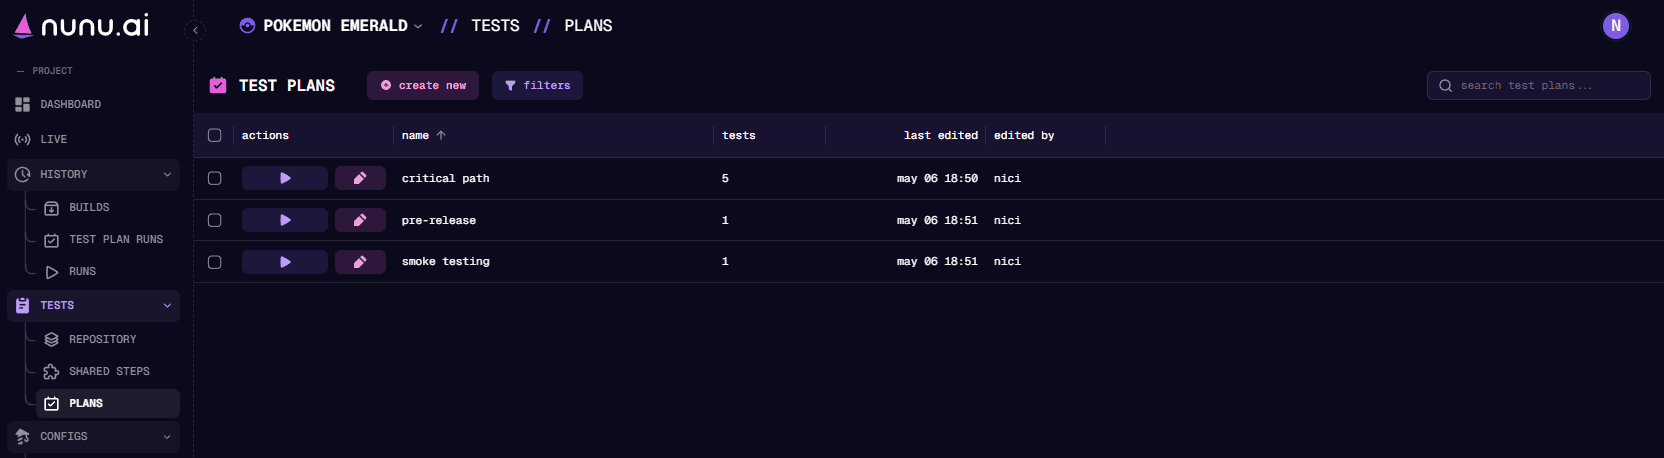
This view shows all of your created test plans. It should look similar to this:
What is a Test Plan?
A Test Plan is a collection of test cases that are executed together as a group. They’re particularly useful for regression testing, feature validation, or running comprehensive test suites before releases.
Creating a Test Plan
Creating a test plan is straightforward:
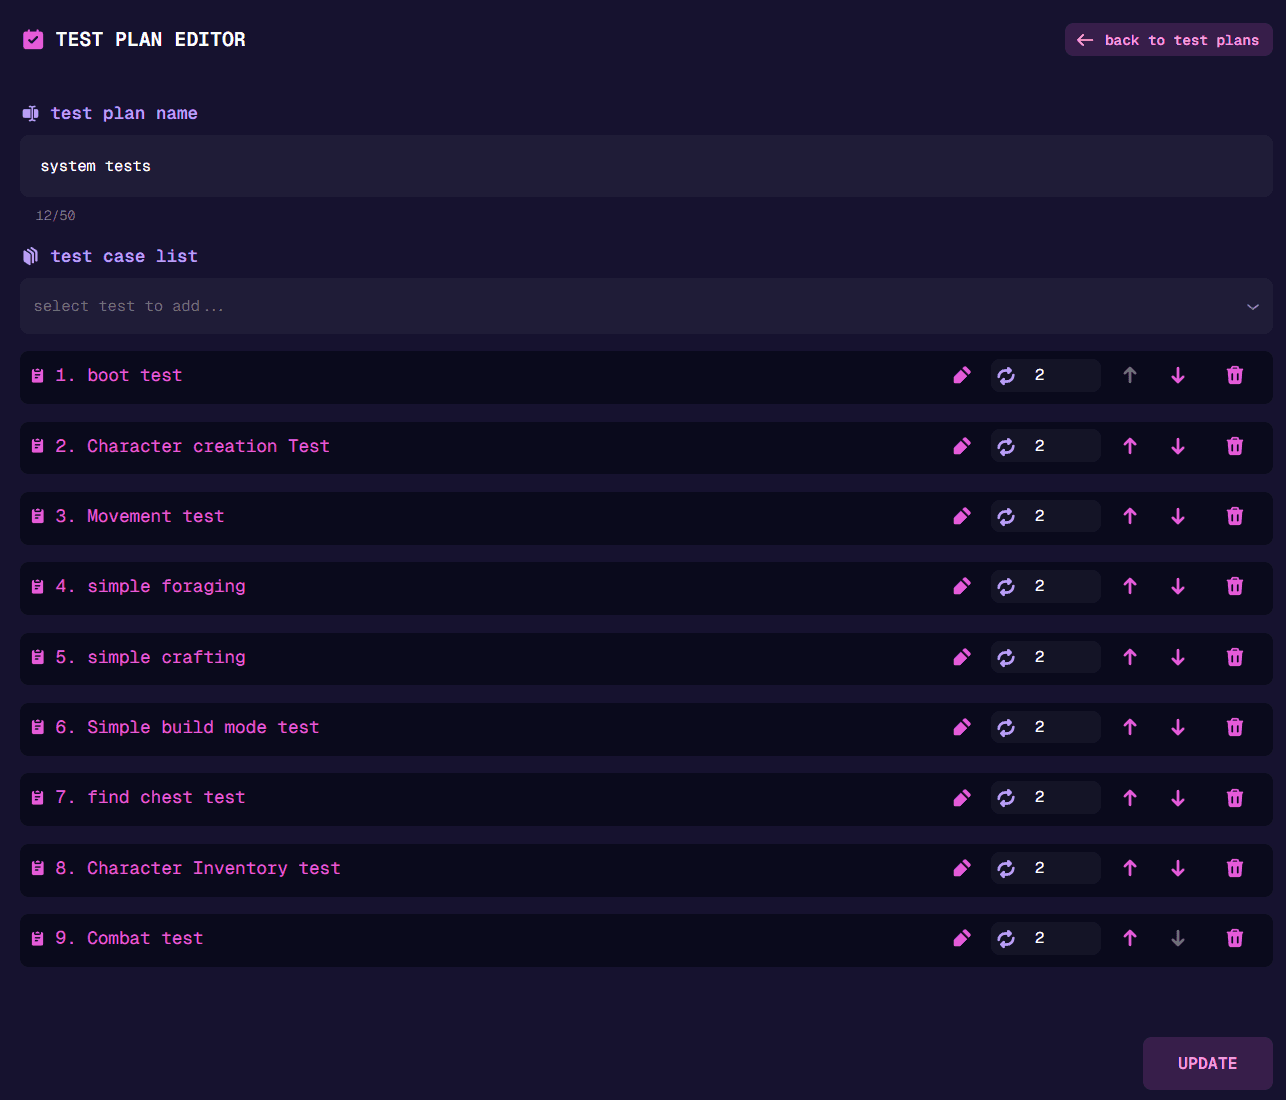
- Press the [ create new ] button to create a new test plan and open the Test Plan editor.
- Add all tests one by one to the test case list using the drop-down menu.
Use each test card’s controls to edit the test case, set how many times it retries after a failure, or remove it from the plan. Drag a card by its handle to change its position; tests are queued in plan order.
We recommend setting the number of retries
to 1 or 2. If a bug exists, the AI agent will fail each time, but you’ll reduce the number of false positives.
Running a Test Plan
You can either manually start a test plan by pressing the [ ] button or set it to trigger automatically.
Review executions in History → Test Plan Runs. Click details on an execution to inspect its individual runs.
Check out the Trigger page for additional information on automatic test plan execution.
Test Plan Templating
Use templating to run a test with different inputs. Template defaults provide shared values; each variant schedules one run of its test.
Set Defaults and Variants
- Add variables such as
{{environment}},{{character}}, or{{difficulty}}to your test instructions. See Templating with Handlebars for syntax. - Add the tests to your plan. The editor detects variables from their latest saved versions. Expand template defaults to set shared values.
- Expand a test card and fill in its variant rows. Click add variant for another run. Blank cells inherit defaults, shown in gray.
- Save the plan to keep its defaults and variants.
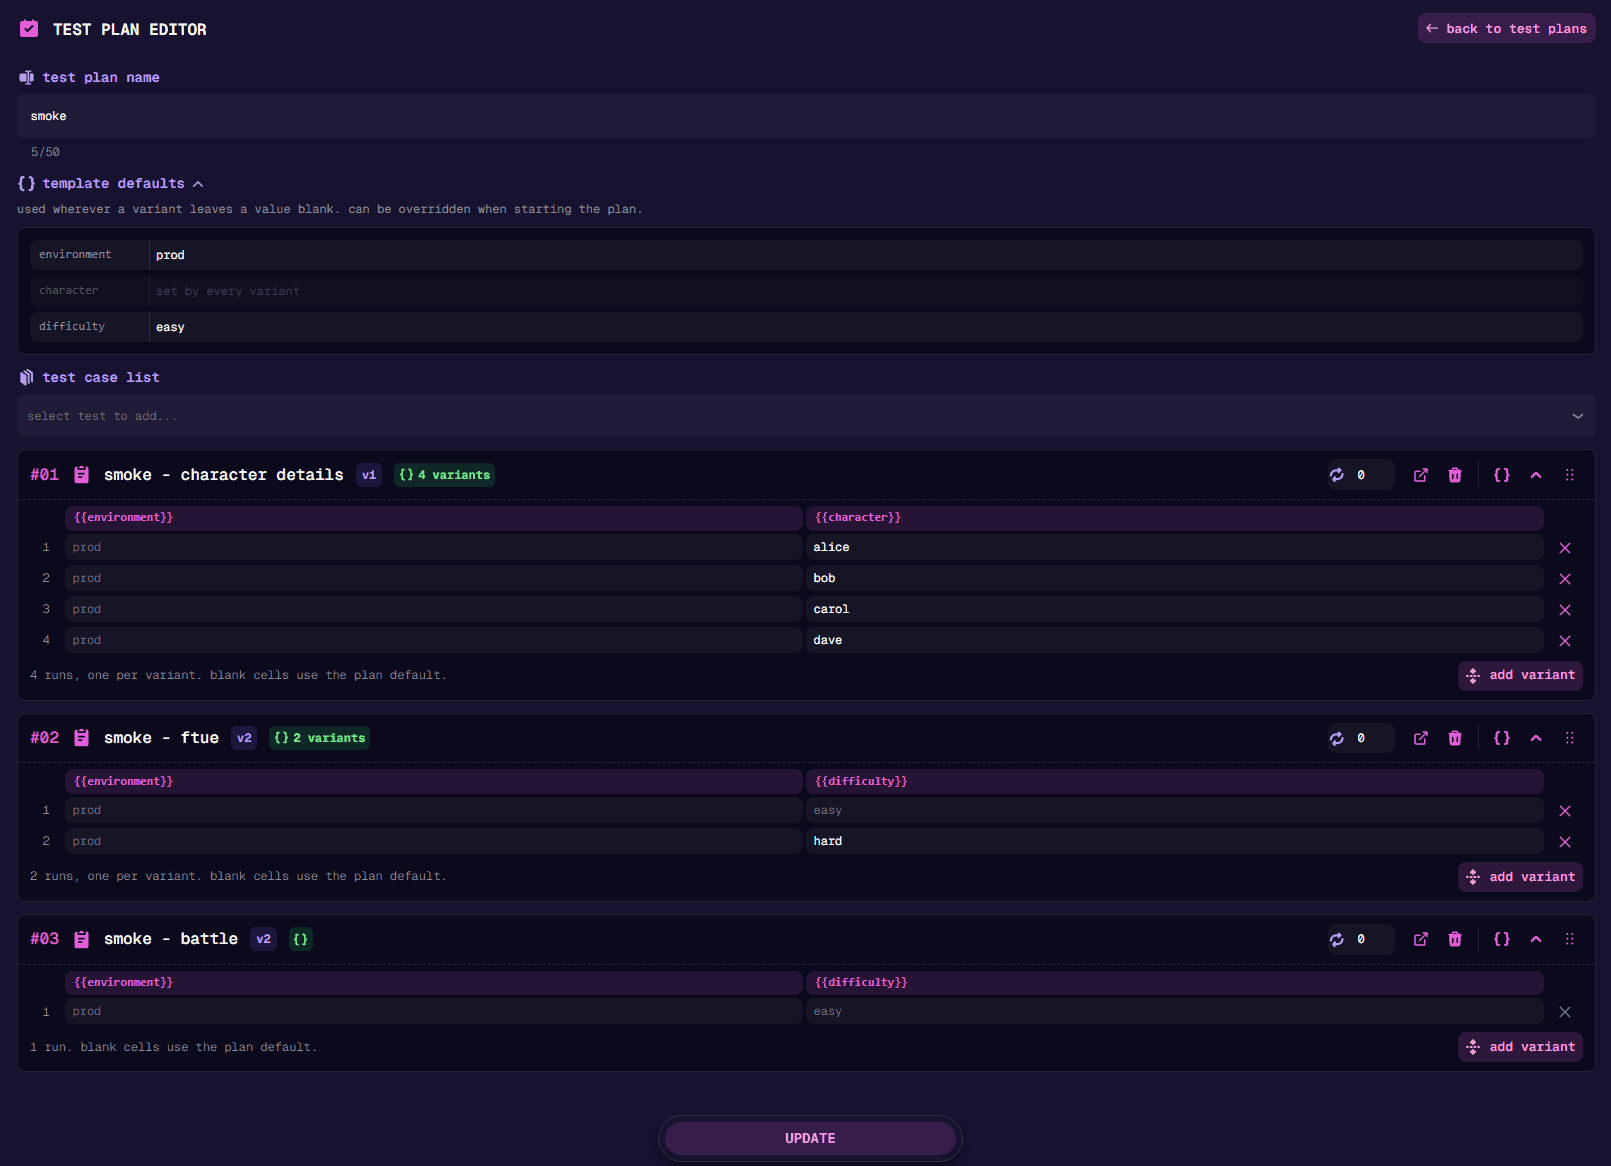
Starting this plan with its saved defaults schedules seven runs on prod: four character details runs for alice, bob, carol, and dave; two ftue runs on easy and hard; and one battle run on easy.
The editor marks missing values; supply them in the plan or when starting it. To fill a column at once, paste multiple lines into a cell. Edit variants as json accepts a list of objects, one per run, and replaces that test’s variants when applied.
Start a Templated Plan
Start the plan and select its deployment config and build. Advanced settings opens automatically for templated tests. Enter template overrides to change shared values for this execution; blank fields keep the saved defaults.
Values take priority in this order: variant → launch override → plan default. Fields marked set by every variant already have explicit values in their rows.
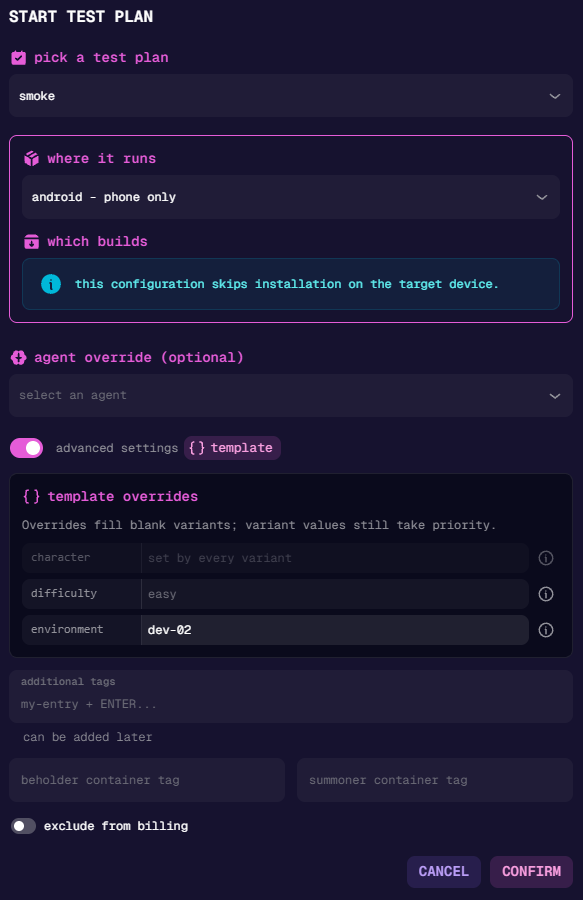
Setting environment to dev-02 sends all seven runs to dev-02. The character and difficulty values stay as above, including the explicit hard ftue variant.
Review the execution in History → Test Plan Runs. Open a run’s Run Details and check Templating Data for its resolved values.
Cross-Platform Test Plans
Cross-Platform Multiplayer is not enabled by default
Contact your project admin to enable this feature, or learn how to enable it yourself if you have admin access.
Normally every player of every test in a plan runs on the same deployment config, which you pick when starting the plan. Cross-platform test plans let individual players of a multiplayer test run on their own platform instead, for example player 1 on PC and player 2 on mobile, to test cross-play features like shared lobbies, invites, or trading between platforms.
Deployment Slots
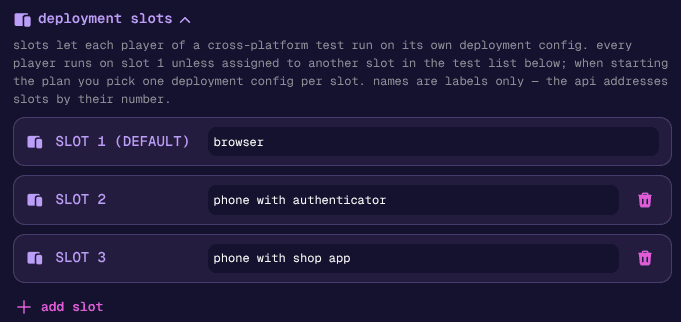
A test plan defines deployment slots; each slot is one deployment config choice you make at start time:
- Every plan has slot 1, the default slot. Every player of every test runs on it unless assigned to another slot.
- Extra slots (slot 2, 3, and so on) are added in the deployment slots section of the test plan editor. Slot names are optional labels (e.g. “mobile”) that make assignments easier to read; slots are always identified by their number.
Assigning Players to Slots
Once a plan has extra slots, each test card in the test case list shows one slot selector per player. Leave a player on the default slot or assign it to an extra slot. Assignments are per test, so a single plan can mix regular tests with cross-platform ones.
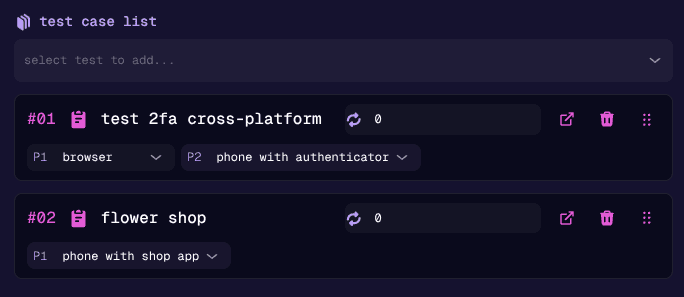
Removing a slot moves its assigned players back to the default slot and renumbers the slots after it.
Starting a Cross-Platform Plan
When you start a plan whose players use extra slots, the start dialog asks for one deployment config (and build) per slot instead of a single one. Only slots actually used by at least one player assignment need a config, and the default slot only needs one while at least one player still runs on it.
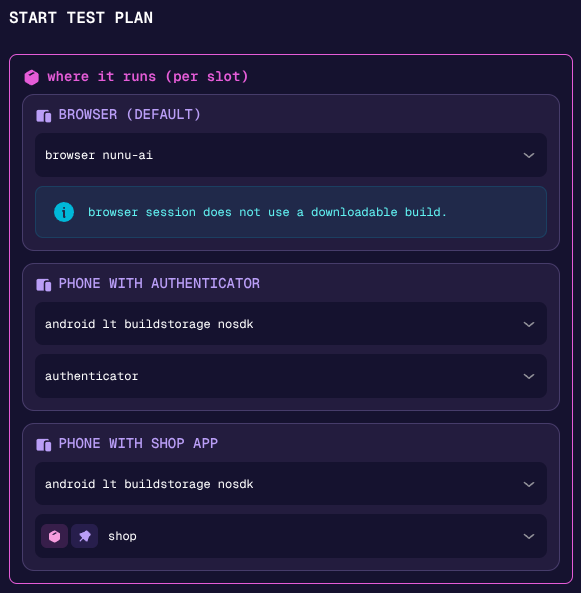
This also works via the API: supply slot_deployment_configs keyed by slot
number when starting the plan. See the
Start Test Plan Run
API reference.
Limitations
- Private device configs work for slots and as the default, but every player on a private device needs its own device: the configs used by a test must together provide at least one distinct device per player.
- Triggers currently start test plans with a single deployment config, so plans whose players are assigned to extra slots cannot be started from triggers yet.