MCP
To create your first tests, review the results, and set up recurring runs with your AI assistant, follow the MCP Quickstart.
Nunu has two ways to connect an MCP client: a remote MCP you point at a URL, and a local MCP you run yourself with npx.
- Remote MCP — nothing to install. OAuth happens in the browser and the server runs on nunu.ai. Good default for day-to-day use in Claude, Cursor, etc.
- Local MCP — a stdio server from
@nunu-ai/nunu-clithat you log into once from a terminal. It proxies the same remote tools, but adds tools that need your local machine or extra time, like uploading a build file straight from disk or waiting for a test plan run to finish.
Remote MCP
The remote MCP uses dynamic client registration and OAuth, same as before, but there are now two endpoints:
https://nunu.ai/mcpThe global endpoint above works across every project you have access to in the organization you pick when authorizing — your MCP client picks the project per call. If you’d rather lock a connector to a single project, use the project-scoped endpoint instead:
https://nunu.ai/mcp/{projectId}You can get the projectId from the nexus url https://nunu.ai/nexus/{projectId}. Everything below in this section (auth, client setup, API keys) works the same for either URL — just swap in whichever one you need.
How Auth and Permissions Work
- You authenticate through OAuth when connecting from your MCP client: it opens the nunu.ai sign-in page in your browser, and you sign in the same way you sign in to Nexus.
- If you belong to more than one organization, you pick one while signing in. The connection only reaches projects in that organization; to use another one, re-authorize the client and pick that organization.
- The MCP session uses your Nexus user identity.
- The MCP can do everything you are allowed to do in that project (or projects, on the global endpoint), and nothing beyond your permissions.
After signing in, you’re asked to allow the client access to your account. The screen shows the client’s name and the address you’ll be sent back to afterwards:
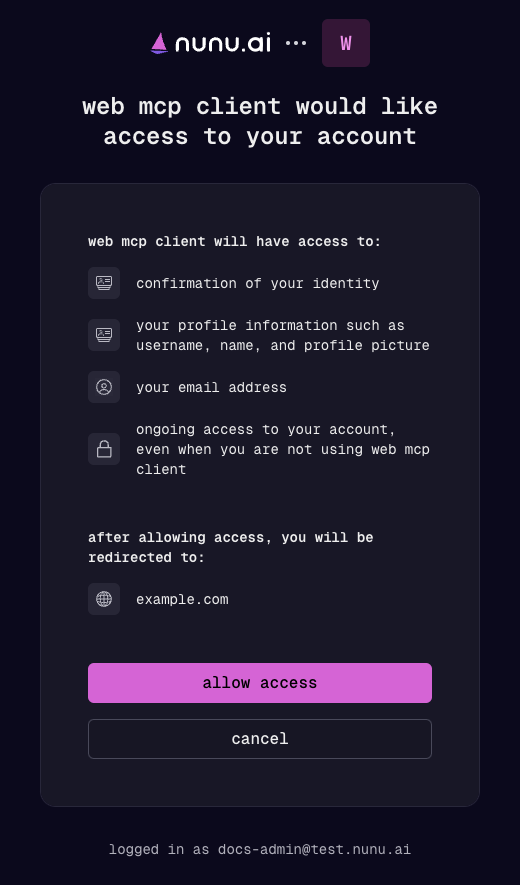
Check the app before you allow access
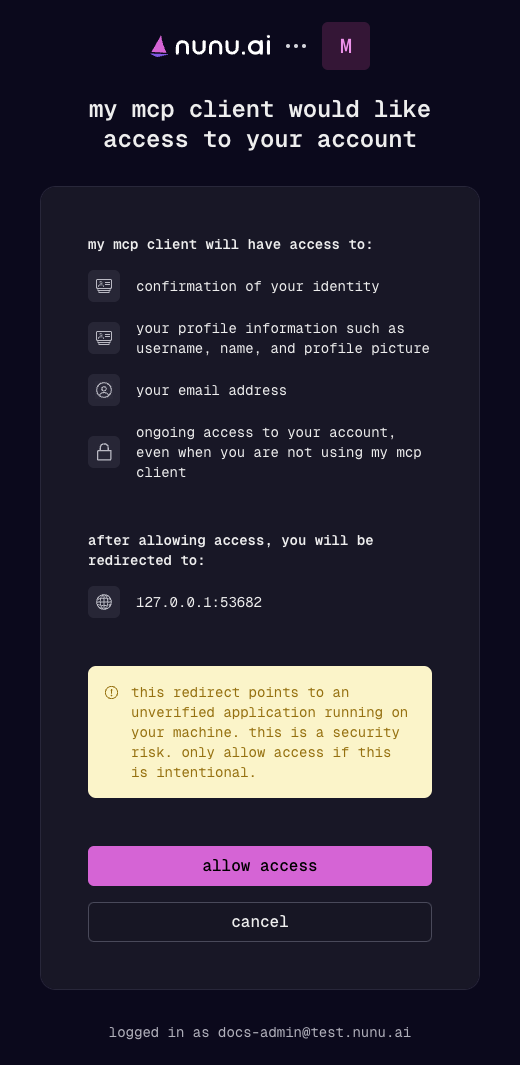
Only click allow access if you recognize the app name and the address it redirects to. For apps running on your own machine, such as the local MCP login, the redirect address is 127.0.0.1 and the screen warns that it points to an unverified application on your machine. That’s expected when you started the login yourself; if you didn’t, click cancel.
MCP clients you connected before September 30, 2026 need to be re-authorized once. Reconnect or re-authenticate the server in your client.
ChatGPT (Official Plugin)
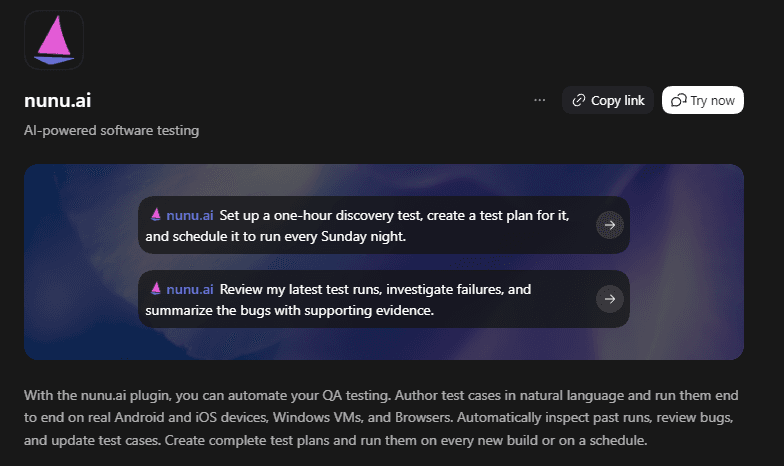
The easiest way to use Nexus in ChatGPT is our official nunu.ai plugin. There’s no URL to paste; it connects to the global endpoint and works across every project you have access to in the organization you pick.
Open Plugins
In ChatGPT, click Plugins in the sidebar.
Find nunu.ai
Search for nunu.ai and open the plugin.
Connect
Click Try now and complete the OAuth flow in the browser window.
Once connected, mention nunu.ai in a chat (or pick it from the tools menu) to use it, for example: “Review my latest test runs, investigate failures, and summarize the bugs with supporting evidence.”
Claude (Custom Connector)
Open Connector Settings
In Claude, go to Settings → Connectors.
Add Connector
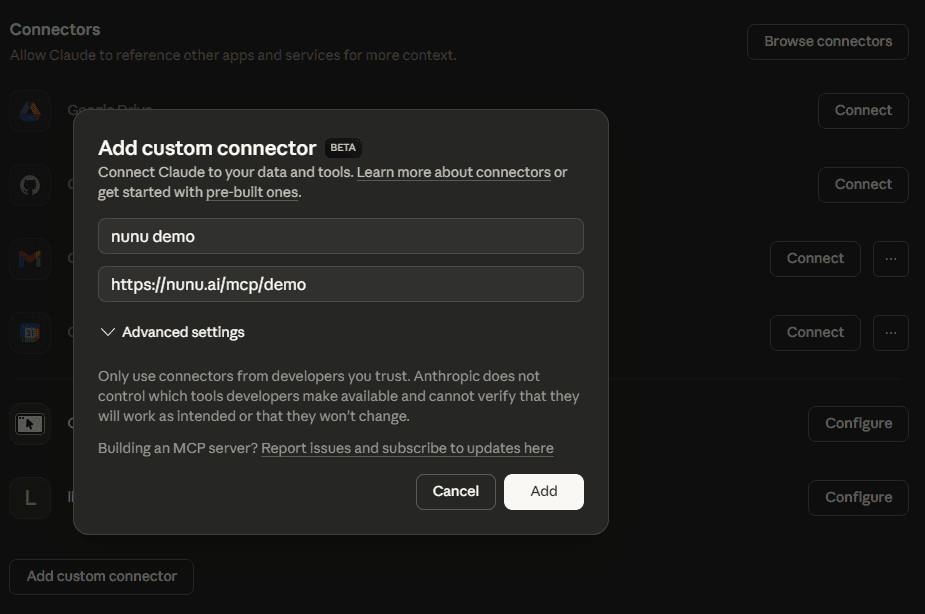
Click Add custom connector.
Enter Details
Use any connector name, then paste your MCP URL — the global endpoint (https://nunu.ai/mcp) or a project-scoped one (for example, https://nunu.ai/mcp/my-project).
Connect
Click on Connect, sign in to nunu.ai in the browser window and click allow access.
After OAuth, the connector is ready to use with your Nexus MCP tools, scoped to whichever URL you connected.
Claude Code
Claude Code automatically syncs MCPs from your Claude desktop app. If you prefer to add the MCP only to Claude Code, run:
claude mcp add --transport http nunu https://nunu.ai/mcpThen start the CLI, enter the /mcp command, select the newly added MCP, and choose 1. Authenticate.
Codex CLI
Run:
codex mcp add nunu --url https://nunu.ai/mcp
codex mcp login nunu
MCP JSON Clients (Generic)
For clients (cursor, windsurf, zed…) that use MCP JSON config, add a remote server entry with the MCP URL.
{
  "mcpServers": {
    "nunu": {
      "url": "https://nunu.ai/mcp"
    }
  }
}
Then click Connect (or equivalent) in your client and complete OAuth.
Field names may vary by client, but the only required value is the MCP URL — swap in a project-scoped URL if you want this connector locked to one project.
API Key Authentication
For bots and CI pipelines, use an API key instead of OAuth. API keys are project-scoped, so use the project’s MCP URL.
{
  "mcpServers": {
    "nunu-my-project": {
      "url": "https://nunu.ai/mcp/my-project",
      "headers": {
        "x-api-key": "your-nunu-project-api-key-here"
      }
    }
  }
}
API keys are for automation and building apps. If you’re just using Nexus in your favorite LLM for daily work, use OAuth. It tracks who did what.
Local MCP
The local MCP ships inside the @nunu-ai/nunu-cli npm package. It runs on your machine as a stdio server and proxies the same global remote MCP, so you still get every tool from the section above — plus a few tools that only make sense running locally:
- Upload a build straight from a file on disk, without leaving your MCP client.
- Wait for completion of a job, a multiplayer run, or a test plan execution, so an agent can block until a run finishes instead of polling.
- More capability is planned here over time — for example, uploading knowledge directly from local files instead of pasting content into context.
Because these tools take a project ID per call rather than being locked to a URL, one local server works across every project you have access to in the organization you picked when logging in.
The local MCP requires Node.js 18+ and npx, plus a one-time login command in your terminal. If you just want to chat with Nexus data day-to-day, the remote MCP above is quicker to set up.
Log in once
npx --yes @nunu-ai/nunu-cli auth loginThis opens the nunu.ai sign-in page in your browser (pass --no-browser to print the link instead). After you sign in, the consent screen shows a warning that the redirect points to an application on your machine: that’s the CLI, so click allow access.
Use auth status to check who’s logged in and auth logout to remove the credential. For CI or other non-interactive use, pass --api-key instead, or set NUNU_API_KEY in the server’s environment.
Configure your MCP client
Add the local server to your client’s MCP JSON config:
{
  "mcpServers": {
    "nunu": {
      "command": "npx",
      "args": ["--yes", "@nunu-ai/nunu-cli", "mcp"]
    }
  }
}
Use it
Restart or reconnect your MCP client. The server starts on demand, reuses your login from step 1, and exposes the remote tools plus the local-only ones (upload_build, wait_for, …).
Configuration
NUNU_API_KEY— API key for CI or other non-interactive use.NUNU_BASE_URL— Nunu deployment URL; defaults tohttps://nunu.ai.NUNU_WORKSPACE_ROOT— root directory the local MCP file-upload tools are allowed to read from; defaults to the client’s working directory.
MCP tools always take project_id as an argument per call, so one server works across all your projects in that organization without a default.
Limitations
The MCP can read and drive most of a project, but a few things are intentionally left out:
- No credential or API key management. Creating, editing, or revoking credentials and API keys can’t be done over MCP — do this in Nexus directly.
- Build upload is local-only. Uploading a build artifact requires the local MCP, since it reads the file from your machine. The remote MCP can’t upload builds.
- No project administration. Inviting people to a project, managing members, and roles/permissions aren’t exposed to MCP tools.
- Triggers are limited to Cron and Build Storage. Webhook triggers can’t be created or edited over MCP.
- Deployment configs are limited to Nunu build storage. MCP can’t configure a deployment to install from a direct download link, a CI/CD provider, or Steam — only builds already uploaded to Nunu build storage.
Manage Connected Apps in Nexus
You can review and revoke OAuth access at any time: click your profile icon (top-right), choose account and open the connections tab. Click the unlink icon next to an app and confirm with REVOKE.
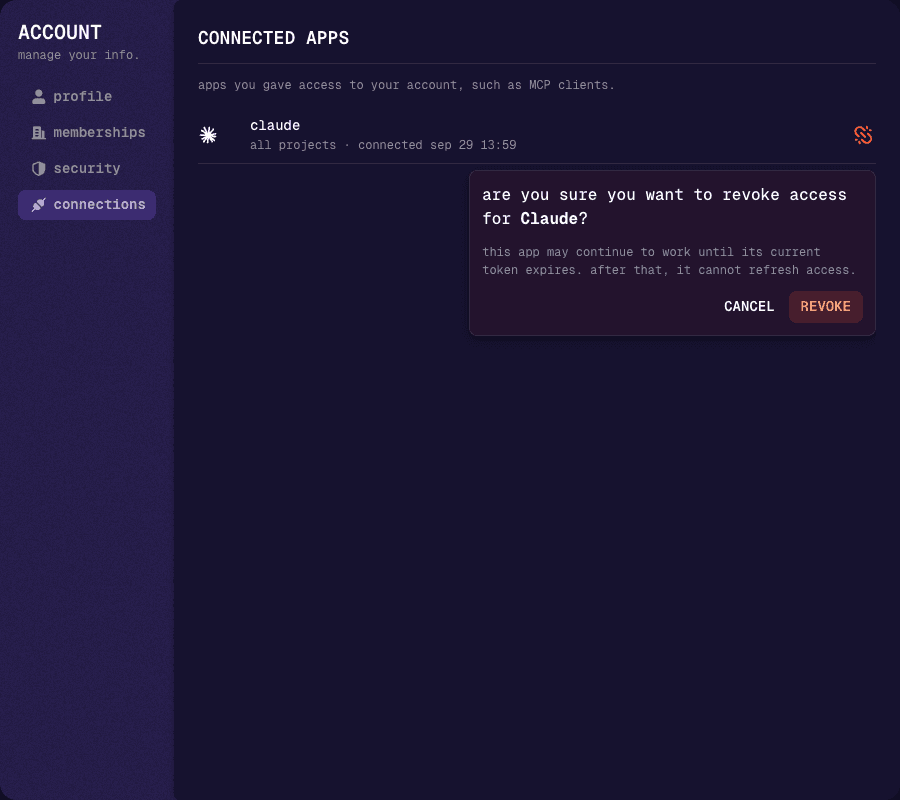
A revoked app may keep working until its current access token expires, but it can’t renew access after that. To use it again, connect it again.