Deployment
To access the Configs tab, you’ll need the project-view-configs permission,
which is available to users with the Config Manager role or other roles that
include this permission.
A Deployment Configuration consists of three key components:
- Where to run: The platform your game runs on (e.g. Windows, Android, ..)
- How to run: Settings for how the game is run and played. This includes input method for windows (keyboard/mouse or controller), the specific phone model for mobile platforms, and the nunu SDK mode
- How to install: The source of the game build. This can be nunu build storage, a download link, CI/CD providers or steam.
When starting a new test run, you’ll be prompted to select one of your created deployment configurations.

Platforms
nunu.ai currently supports the following platforms:
- Windows
- Android
- iOS
You will only see the platforms that are enabled for your project.
Windows
For the Windows platform, you can select the kind of input method you want to test your game with. Options here are keyboard/mouse, controller, or no input (in this case, only the sdk functions you implemented will be used).
You can also supply command line arguments to your game executable.
Mobile
The mobile platform supports a selection of Android and iOS devices. You can choose the specific device model you want to test your game on. The deployment config editor will show you the current list of supported devices.
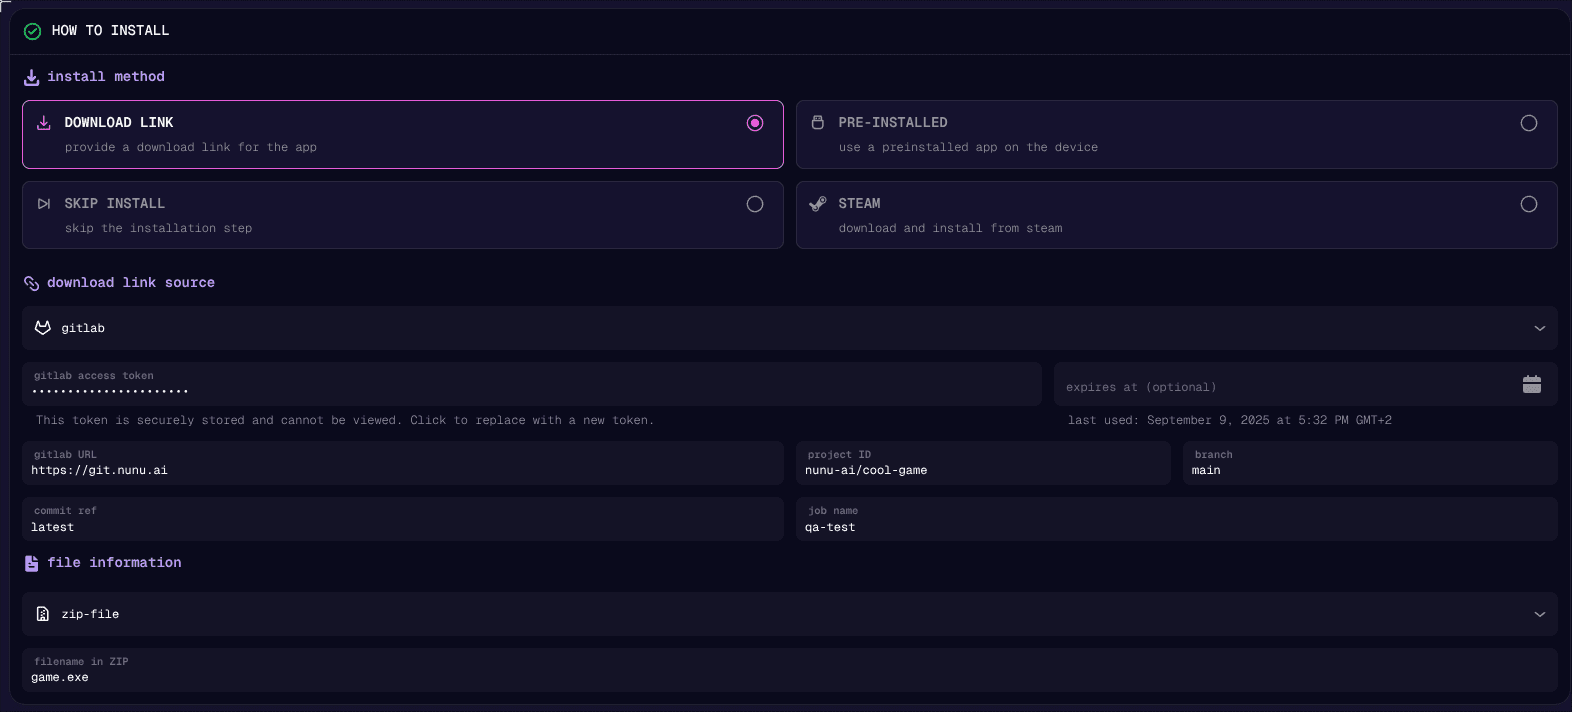
How to install
This section provides options on how the nunu.ai runners download and install your game build.
The most common option is ‘Download Link’, which allows
downloading a game .zip/.apk/.ipa/ … file from various sources. These sources include nunu build storage, direct download link or CI/CD Providers such as GitLab, Jenkins, Applivery and others.
Other options that might be available, depending on your platform are:
- Preinstalled: If you want to run something that is already available on the device you run on without needing an installation, choose this option.
- Skip Install: If you want the agent to start on the device desktop/homescreen, without launching a specific game/app, choose this option.
- Steam: On Windows, you can provide a Steam App ID and login/beta details to download your game build from steam.
Steam
For steam to work properly, you need to provide the following details:
- Steam App ID: The unique identifier for your game on Steam.
- Login: The username and password of a steam account that owns the game identified by the app id.
- Beta: The name of the beta branch you want to download from. Optionally, the beta password can also be provided if required.
- Steam guard maFile: Here you can paste the contents of or upload a steam guard .maFile (see explanation below)
Steam Guard
For the Steam integration to work, you need to either fully disable Steam Guard on the account you are using to download the game, or provide Steam Guard secrets.
To fully disable Steam Guard on your account, go to https://store.steampowered.com/twofactor/manage while logged into the account, and select ‘Turn Steam Guard off’. Be aware that this might pose a security risk.
To use Steam Guard, you need to set up Steam Guard on the account using steamguard-cli . Follow these steps:
- Under the Releases tab, download the latest version of the CLI.
- Move the executable to an empty folder
- Open a commandline in this folder
- Run
./steamguard.exe -m . setup - Enter username, password, and auth code from email or previous steam guard
- Now steam guard has been linked
- Save the ‘Revocation Code’ (used to restore access if the steam guard secret is lost)
- Drag the newly created <username>.maFile from the folder into the nexus deployment config editor
Save the .maFile and the revocation code! You need them to restore access to the account, or to revoke access.
The program’s output will look similar to this:
$ steamguard -m . setup
INFO reading manifest from .
Log in to the account that you want to link to steamguard-cli
Username: nunu_ai
nunu_ai_infra
INFO Logging in to nunu_ai_infra
Password:
Enter the 2fa code sent to your email: <code>
<code>
INFO Polling for tokens... -- If this takes a long time, try logging in again.
INFO Logged in successfully!
INFO Adding authenticator...
INFO Saving manifest and accounts...
Authenticator has not yet been linked. Before continuing with finalization, please take the time to write down your revocation code: <code>
Press enter to continue...
A code has been sent to the email address associated with this account.
Enter email code: <code>
3NCG2
INFO Verifying authenticator status...
INFO Authenticator finalized.
INFO Saving manifest and accounts...
Authenticator has been finalized. Please actually write down your revocation code: <code>
SDK Mode
We offer three integration options:
- No SDK: Runs your application without Nunu SDK integration, ideal for black-box testing.
- SDK: Starts tests immediately after installation, but connects to and uses the Nunu SDK.
- Wait SDK: Delays test start until the SDK connection is fully established. This is useful for starting after initial loading has concluded.
If you haven’t integrated the SDK yet or are conducting black-box testing, select the No SDK option to begin testing right away.